Tuesday, August 27, 2013

Fall Hair Color Trends

Hi! If you are anything like me you are getting super excited for fall. Darker more dramatic makeup, sweaters, boots, changing of the leaves and who can forget all the pumpkin scented items. It's my favorite time fo the year. Fall may not technically be here yet but I'm already starting to notice some fall color trends. Maybe I've noticed it more because I'm getting ready to color my hair for fall. But either way here are some of the trends.
 
1.Ombre
Ombre has been popular pretty much all year so here are a few pictures of this trend that I really like. You can follow this trend with pretty much any shade of hair. You can also go very bold with it or do more like subtle ombre highlights.


2.Red and Red Brown
Red has always been a popular color for fall. And again you can go as bold or subtle as you want with this trend. Try adding a red tone to your hair or some red lowlights.
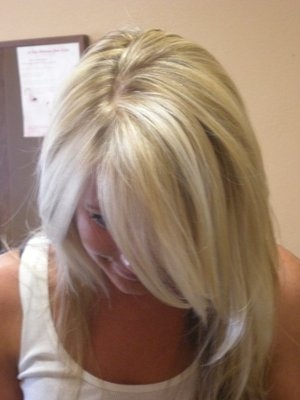


3. Darker Blonde
You can get your summer blonde hair fall ready by going all over a little darker or adding some lowlights. Here are a few I'm really loving.


4. Warm Browns with (or without) Dimensional Highlights or Lowlights
Another trend I've noticed is the usually warm browns but they have some slight highlights or lowlights to add some more dimnesion and warmth. Some pictures are just the usual rich browns but they are still pretty.


So those are some of the fall hair color trends I've noticed. Maybe this will help you decide what fall color trend you are going to try. As for me I'm still very confused lol. They are all gorgeous choices.Anyways I'll post again soon!
 
- Eat Sleep Makeup

Monday, August 26, 2013

How To Get The Haircut You Want

Hi! So this is a random post that came to my mind. As a cosmetologist I know what it is like to be on both sides of the chair. I've had stylists do everything from "Did I even get a hair cut?" to " I said a trim and now my hair is 5 inches shorter." Honestly the bad haircuts are from just not enough of a consultation and communication. I won't lie sometimes the person cutting your hair is to blame because they lack skill, don't care, or whatever the reason. With that said if at any point you don't feel comfortable or feel you and the stylist aren't on the same page don't be afraid to leave. Most stylists want you to be happy with your hair even if that's not with them. Anyways on to the actual tips.
 
1. PICTURES! I cannot stress this enough. Pictures are ideal because it shows what you want. You can bring as many as you want quite honestly. I LOVE when clients bring pictures. It gives us a starting point.
For example you could be like I really like the length and layers of this cut.
 
But I want my bangs to look like this.
 
It doesn't hurt to bring pictures of things you don't want too. Whatever you think will help communicate what you want. This is also a good idea for getting your hair color.
 
2. Have realistic expectations. I haven't had this happen very often but occasionally someone will come in and want something that just won't work. So have a backup plan in case your original plan won't work. Don't be afraid to ask questions about why it may or may not work for your hair.
 
3. Know how much work you are willing to put into your hair. Don't pick out a style that is going to need to have styling products and need to be round brush styled if you are a wash and go type of person. UNLESS you are willing to change that and put in the time to style it.
 
4. Go for just a consultation. I really recommend this if you are making a drastic change to your hair or if you are going to a new stylist. This way you get to talk to the stylist and find out ahead of time if this style will work for you and how they would cut it. That way the day of your appointment you can relax a little more.
 
5. If you get a haircut you love ask what they did. That way if for whatever reason you need to go to another stylist you can tell them what your last stylist did. For example I like my hair texturized. I don't like blunt ends and a good friend of mine texturized my hair so that I would get more volume because sometimes my hair can get a bit heavy. Now I pretty much always ask for it to be texturized. I haven't the last two times I got it cut but usually I do.  It's also not a bad idea to get a picture of your awesome haircut before you leave the salon so you have it as a reference for next time.
 
I hope these tips were helpful. These are a few I have found to be really helpful. I hope you guys enjoyed reading and I'll post something again soon.

Friday, August 23, 2013

Back To School Makeup Tutorial

Hi! So maybe I'm a little late for the back to school thing but school doesn't start here until after Labor Day. I'm not super happy with this tutorial but it is using mostly cheap products. I can't totally say drugstore because I used a shadow from my 88 Warm Palette. Anyways it's pretty, easy, and importantly quick.
 
I started applying my Revlon ColorStay Whipped Foundation. Then I applied L'Oreal Infallible eyeshadow in Iced Latte on my lid and as my inner eye highlight.

Next I applied a color from my 88 Warm Palette into my crease and outer v. I also applied some along my lower lashline but you can skip this. I did mostly to help my liner stay in place. This is the color I used.


Next I applied a matte highlight color under my brow bone but you certainly don't have to if you're in a hurry. Then I applied Almay Intense Liner in Topaz in my upper and lower lashline. I filled in my eyebrows with my Rimmel pencil and applied my L'Oreal Volminous Million Lashes mascara. And the eyes are done!

 
For the rest of the face I applied my elf blush and lastly some lip balm. You could apply your favorite gloss instead. And your finished and out the door!


Ok so my mind is drawing a blank on what to do for future posts. I do have a few things planned like an outfit of the day for my first day at my new job and fall fashion post (one more thing to get and I should be ready for that post). Maybe a work fashion post? That's what most of my closet is anyways lol. I will post something again soon. Hope you guys enjoyed this post and thank you for reading!

Friday, August 16, 2013

Going Blonde!

Hi! So as you can probably guess today's post is about me going blonde. I have been holding this off for awhile because growing your hair out and going blonde can be a challenge. Bleach can be so damaging for your hair which you do not want when you are trying to grow it out. So I'm going to kinda of start with what I did and where I hope to go with this. A little history about my hair I have gotten my hair completely platinum before. Platinum isn't really my color but I've also had it bleach blonde. If I had put a toner on it would become platinum but by not it was a little more warm neutral blonde which looked way better. Anyways I have always loved really light blonde hair. I've been wanting it for months but since I was growing my hair I held off as long as I could. Starting a few months back my hair was dyed around a level 5 this is how it looked.
I really hated it but I was slightly lighter than the color I did before. I left it this way for about 2 months. I let it fade and get as light as it could. In late June early July I decided to use some color remover and go to a half 7 half 8. My hair is naturally a level 7. This is how that looked.
 
I think the color remover didn't work that great and it was still too dark. For some reason that last step with the neutralizer takes your hair back dark. Anyways about a month ago I caved. I needed bleach blonde even if it was just highlights. So I got all over highlights which made my hair look so much lighter. I really liked the color but in two weeks right before we left for vacation I really wanted more. So we put in more blonde highlights which is what I currently have.
 
 It definitely looks lighter but I'm already wanting more and it's only been a couple of weeks. I'm going to leave it like this up until I start my new job or at least that's the goal. But eventually I'm trying to achieve something more like this.


I know some are lighter and some are darker and they are different in their own way but I really want a multi dimensional blonde. Right now when my bf looks at my hair he says it is more caramel colored and I know he is referring to the darker color. I'm hoping to go light enough that he will say blonde not caramel. So I'm thinking I'm going to reach out to a friend that knows how I like my hair and have her do some serious foiling which I'll try to remember to take pictures of the process. I'm kinda hoping this helpful if anyone is trying to go lighter and doesn't want to right away reach for the bleach. Bleach your whole head can be.... actually quite scary. So this is a little more gradually and easier on your hair. I'll keep you guys updated and hope you enjoyed reading this!

Thursday, August 15, 2013

Day To Night Makeup

Hi! Today I'm doing this day to night look. I wore this look in Vegas. I wore the day look walking the strip during the day and the night look when we went to a show that night. It's pretty easy and it looks really nice. Anyways on to the day tutorial!
 
First I applied my Tarte Amazion Clay Foundation in Light. Then starting with the eyes I applied UD Bootycall from the Naked 2 palette. Honestly you can use UD Virgin instead if you prefer. I used Bootycall because this tutorial mostly uses the Naked 2 palette.
 
Next I applied UD Naked as a blending color just above my crease but below my brow bone.
 
Then I applied UD Tease into my crease and outer v.
 
To finish up the eyes I applied Bootycall to the inner corner. I applied Tease on my lower lashline. Then applied my 24/7 Perversion eye pencil to my upper lashline. I applied one coat of my L'Oreal Volminous Million Lashes mascara.
 
For the rest of my face I applied my elf blush from the blush and bronzer duo. I very lightly filler in my brows with my Rimmel pencil in Hazel. And lastly I applied MAC's Creme Cup lipstick.
 
Now onto the night look to step things up a bit! All I did was first lightly apply UD Blackout into the crease and outer v. Then I went back and I applied it heavier into my outer v to add more definition. Then to make it blend better between the Bootycall and Blackout I applied a little bit Tease and Hustle mixed together to create more of a gradient. I added a little bit of Blackout to my outer lower lashline. I contoured with my elf Blush and Bronzer duo. I added a second coat of mascara this time with my Sephora Atomic Volume mascara. I also defined more brows a little more. Lastly I applied MAC Craving lipstick but I prefer a more nude lip so I also applied MAC Hue lipstick.


That's it! Like I said it's easy and looks nice. I did the day tutorial during the day and the night one at night but I should have done both during the day because the day pictures look better because the lighting is better.  Anyways I hope you guys enjoyed this post. Thank you for reading(: