Wednesday, January 30, 2013

Review: L'Oreal True Match Lumi Foundation

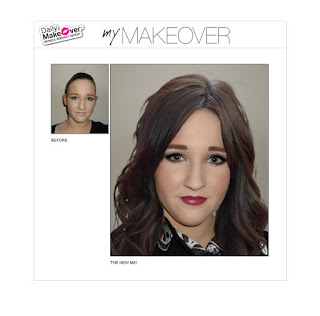
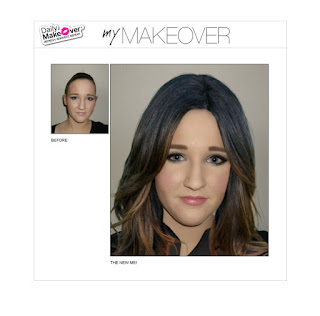
Hi! So this is my review of the L'Oreal Lumi Foundation. I have been trying it out a few ways and I'll share with you my favorite way to to wear it. Also the pros and cons of this foundation. So to start things off this is how it looks:
 
 
I really like the packaging and it has a pump. I really think all foundations should come with a pump. I like that they made Lumi noticeable on the bottle. On to the pros, I do think it has nice coverage and luminous finish. I have oily skin so the finish was my main concern. You also don't end up looking like a shimmery disco ball either. I like to apply an anti-shine primer before to get rid of any oil so you just get the glow from the foundation. Once it was applied I decided to set it with powder because I can image without something to set the foundation it would eventually wear off and look too oily. And after wearing this foundation for 4 hrs I decided to reapply my powder and add a setting spray. I'm not used to luminous finish foundations so maybe that's why but I felt my face looked slightly oily. It really wasn't too bad but I didn't want it to get worse or the makeup completely slide off my face. So far it is holding up much better with the added setting spray. On to the coverage! I loved the coverage at first. It has less coverage than my MAC foundation so this is more medium coverage. However I took some pictures and realized it didn't cover as well in pictures as it does in person. That made me a little sad but whatever it wasn't a deal breaker. The biggest thing that disappointed me about this foundatin was I heard from a review that there was no sunscreen in this foundation. I was checking out the bottle and I noticed it said "octinoxate sunscreen." BIG disappointment :(. This can be a pro or con depending on if you like sunscreen in your foundation. I don't really like sunscreen in my foundations because it seems too shiny on my face. I'm not sure why some brands are better about having sunscreen in their foundations and others aren't. But to further explain the main reason I don't like sunscreen in my foundation is Neutrogena Healthy Skin Enhancer. There were several things I did not like about this product but the main one being the sunscreen made my face look so greasy. I hated the way it looked when I set it with powder (my face looked dirty) so I just gave up on it. Also the L'Oreal foundation smells exactly like the Neutrogena Healthy Skin Enhancer.  Anyways back to the Lumi foundation. Those are the only 2 cons I've experienced. So now I'm going to share my favorite way to wear this foundation. As I mentioned before I apply an anti-shine primer beforehand. Mine is just the Sephora brand. Next I do equal parts of my MAC foundation and the L'Oreal Lumi foundation. This way I feel like I'm getting the best of both. I'm getting the staying power and fuller coverage of my MAC foundation while still getting the luminous finish of the Lumi foundation. Another bonus I see since I'm mixing the foundations I'm using less of MAC foundation which means I won't run out as fast (the nearest MAC store is an hour away.) It give me a nice finish too. It's not too luminous for cameras but it also isn't completely matte (my makeup has been a little too matte lately). In the end would I buy this product again? And I would have to say maybe. I do like this foundation and the price is good. However the Urban Decay Naked foundation more gives me the coverage and finish I was hoping for from the Lumi foundation. On the other hand I do like this foundation in combination with my other products. I probably would  buy it mostly to use on other people and use it occasinally on myself.  -BUT- I happened to notice the there is a L'Oreal Lumi Magique Foundation. I'm not sure how this is different. I didn't notice another Lumi foundation at the store so I'm not sure what that is all about. Anyways I hope you guys found this review helpful. Thanks for reading!

UPDATE: One more thing I wanted to add to this review is this foundatin takes awhile to set. I will do my entire eye makeup (which can sometimes take awhile) and the foundation still seems wet and will wipe right off my face. If you set it right away with a powder it's no longer a problem.

Tuesday, January 29, 2013

Review: Moroccan Oil Weightless Hydrating Mask

Hi! Things have not went at all the way I was hoping this week. I have been sick which is why my tutorials have not went up yet but they will later this week. Anyways get ready for some reviews! I'm reviewing some products this week and I also have the Coastal Scents 88 Warm Palette on it's way to my house. I may a do a review on it or do some tutorials with it. I also am thinking about doing two Valentine's Day looks. One a little more bold and the other maybe leaning a little more towards Victoria's Secret angel. Anyways on to the review for today. Pretty much everyone has heard of Moroccan Oil. I received two samples of Moroccan Oil in March at a beauty show. I instantly loved it. My friend later introduced me to the whole line of shampoos, conditioners, styling products, and deep conditioning treatments. My friend said she loved the restorative mask but I decided to go with the weightless hydrating mask. This is what the packaging looks like.
I love the packaging. It's the usual blue color that the Moroccan Oil brand uses for it's products. The mask is a typical mask texture. A little goes a long way which is nice since this product can be a little pricey. I love the smell and I can smell it in my hair all day long. It's kind of a relaxing smell at least to me. Speaking of all day long my hair has amazing shine and softness all day. If I'm going for a sleek and shiny look with my hair this mask is a must. However there are some cons. The first would be I'm not sure how much hydration my hair is really getting. Since this products is a mask it should be used about once a week. It feels like the effects of this mask are washed out of your hair the next time you shower. My hair doesn't feel as soft and it starts to feel and look dry on the ends. The second con is while a few uses really does mean weightless anymore is weighed down. It says on the container "Use 1-2 times weekly. Less frequently as hair improves." If I use this product more than once a week my hair feels weighed down. Lately I have been using it once every two weeks which seems to work better. I guess my finally impression would be as much as I like this mask the effects seem to be temporary. I have had this mask for about 6 months and have not completely finished the container. I still feel like my hair has not received the hydration it needs in the long run. If your hair is overall pretty healthy I would recommend this. It comes down to would I buy this again? I would have to say yes. Even though my hair didn't get noticeably better I love how it made my hair feel after using it and the smell. I will be getting a different mask to get the moisture my hair needs. I think once my hair gets longer I will use this mask again. I could see it being really nice for longer hair. Overall I hope this review was helpful. I think for my next moisture mask I will be trying one by Joico in case anyone was wondering. I'm sorry for not yet reviewing the Joico Damage shampoo, conditioner, and mini mask I got. My hair isn't really damaged it just needs more moisture. I'm planning on getting some highlights in February so since I'll be using bleach I'm hoping to test it out more then. I just want to be able to give a really good review for you guys. Another review and maybe a tutorial tomorrow too! Thank you for reading!

Friday, January 25, 2013

Upcoming Stuff

Hi! My original plan for today was to post my tutorial for hazel eyes and do the one for brown eyes on Sunday. However the tutorial for hazel eyes did not turn out at all like I was hoping :(. It just came out too dark. I need to play around with it a little more before I post the final result. So that will probably be posted Sunday instead that or I will post the brown eye tutorial on Sunday. Anyways here are some upcoming posts:
-The Rest Of The Eye Color Tutorials
-Valentines Day Makeup Tutorial
-OOTN (Tomorrow for a friend's birthday)
-Valentine's Day OOTD (also happens to be a friend's birthday)
-Makeup Tutorial Using L'Oreal Infallible Eyeshadow in Midnight Blue
- Some Reviews
 
There will probably be some more random posts in between but this is what I have planned for the next few weeks. I'll be posting again soon! Thanks for reading(:

Monday, January 21, 2013

Quick and Easy Makeup Tutorial

Hi! Everyone has those days where you wake up too late or something comes up and you need to get out the door fast. This is my version of that. It takes me about 5-6 minutes maybe. So let's get started!

 
I started off by applying my L'Oreal Lumi Foundation all over my face. Then I grabbed a shadow brush and applied MAC's Retrospeck on my lids.


Next I applied Tease to my crease, outer v, and lower lash line using the brush that comes with the Naked 2 palette. I also applied Foxy under my brow bone as my highlight. I applied Almay Intense I-Color Eyeliner in Brown Topaz to my upper and lower lash line.
 
 
Next are the finishing steps. I applied my Maybelline Falsies Mascara and MAC's Well Dressed blush. Sometimes I skip my eyebrows but I couldn't stand not to today. So I filled them in quick and lightly. I applied MAC Syrup lipstick and I'm done!


I have some recommendations when you need/want to do quick easy makeup. I would use colors you like on yourself but are also natural. I used neutrals on the eyes, a light pink blush, and syrup is one of those my natural lip color but better shades. The result is you end up looking made up and it was quick and easy. I also have some quick hair ideas.
- Classic Ponytail
- Braid (fishtail, french, and etc.)
- Throw on a stylish hat
-Work with your bedhead (dry shampoo and some hairspray can be a huge help)
- Do something with your bangs (pin them back, braid them, whatever you like)
 
I hope this was helpful. Working on my brown/hazel eye tutorial. I picked up Maybelline 24hr Color Tattoo Eyeshadow in Inked in Pink for the brown eyes tutorial. I'm trying to get a new lipstick for the tutorial as well but I may just stick with what I have. Anyways I hope this was helpful! Thanks for reading!
P.S. I dyed my hair but you can't tell in the pictures. I used half 4N and a 4RR. It is more red-violet now. I really like it. I needed a change (already lol). I'm kind of hoping to keep it this way for awhile. I'm hoping I don't get bored of it because I hate coloring my hair so much when I'm trying to grow it out.

Friday, January 18, 2013

Having Fun Playing With My Hair

Hi! I'm super bored today so I decided to do something I haven't done in awhile. A long time ago I found this website called dailymakeover.com. You can try on celebrity hairstyles and play around with different hair colors. They also have makeup and accessories! So I've been having a lot of fun with this so I thought I would share some of my favorites with you(:
The first one is my favorite and I think I'm going to be dyeing my hair that color soon. For the most part I want to grow my hair out but at some point I do want to go short like the last pic. I'll try naming the celebs hair that I have on in each pic. The first (and my favorite) is Demi Lovato. The second one is Julianne Hough. The third one is I think Demi Lovato again. The fourth is Emma Stone. The fifth is Ashley Tisdale. The sixth is Emma Roberts. The seventh is Katy Perry and the eighth is Rihanna. They have hundreds of hairstyles but these are a few of my favorites. As you can see from my before pictures it is best to take a pic with your hair pulled back and off your face. Its a great way to try on a potential cut or color before actually going through with it. So for my next few posts I have some reviews coming up and some more tutorials. Also I think one outfit of the day for sure. thanks for reading!(:

Wednesday, January 16, 2013

Tutorial for Blue Eyes

Hi! Today is my tutorial for blue eyes. This was the easiest and hardest one for me. Easy because I have blue eyes and I know what works for them. Hard because all my favorite looks starting popping into my mind and I can't decide which one to use for blue eyes. I also happened to think of a few other looks for green eyes which I hope to add at a later date. Eventually I came up with the look I have posted today. So let's get started!

First things first I applied Urban Decay Primer Potion and then I applied Urban Decay Chopper on my lid.


Next I applied Urban Decay Roach to my crease.


Then I applied MAC Sketch in my outer v and along my lower lashline. I decided to put a little bit of Roach towards the in inner corner on the bottom lashline. I also applied my NYX Jumbo pencil in my inner corner and under my eyebrow on my brow bone. Then I applied MAC Honestly over top to the inner corner and MAC Glamour Light on my brown bone. I took a little bit of Urban Decay Half Baked and applied it to the center of my lids to make it pop a bit more. You can see the difference from the picture above.


Lastly I applied Perversion eyeliner on my upper lashline. I decided to smudge it out so I took a small amount of MAC Sketch and smudged away. I applied two coats of mascara and this is the finished look.
  
 
On my face I have my MAC Studio Fix in NC15. I used my Elf Blush and bronzer. Then I applied Hue lipstick. Here are some more pictures.
 
 
 I really like coppers and golds on blue eyes. I also like colors that have a red tone like Roach and Sketch. I hope you enjoyed this look. I ran errands after I did this tutorial and I picked some things up.
 
 
I'll be doing a review of these soon (I hope). Maybe a tutorial with the blue eyeshadow from L'Oreal. It took me a long time to get anything posted because blogspot is having trouble with internet explorer and uploading pictures. Anyways I hope you guys enjoyed this and thanks for reading!(:

Thursday, January 10, 2013

2013 Hopefuls!

Hi! I decided to make a list of products I hope to try (and love) in 2013. Hopefully I will some reviews on some of these! By the way my Joico Reconstruction Set review is coming up. So on to the list!

L'Oreal Lumi Foundation- Heard some good things about this foundation. The only issue I see is I have oily skin. However this winter my skin has been pretty much normal. Hoping this can kind of be a replacement to my Urban Decay Naked foundation which gives my skin a nice finish.

Maybelline Lumi Concealer- I was going to try the L'oreal version but I have heard that they changed the product to be marketed as a highlighter. I don't have a huge problem with dark under eye circles so I don't need a lot of coverage. I would like something to lighten it up.

Make Up For Ever Matte Velvet + - I have used this in the past and I remember not being a huge fan of the coverage. I would like to give it a second chance. Mostly because watching MakeupByTiffanyD makes me want my skin just as flawless and natural looking.

Beyond Belief Skincare- This is a line at Sally's and it doesn't have the greatest reviews. However I'm looking into trying something new. I like that they have a lot of products in there line.

Origins VitaZing Moisturizer- I've heard really good things about this product. I really want to try some more moisturizers. I like my Clinique moisturizer but I don't love it. I'm hoping this can change that.

NYX Cosmetics- I don't own a lot of NYX products. I have 3 that I can think of which are milk jumbo pencil, a purple glitter liner, and a black label lipstick in hot pink (I think). I really want to try some more of their products this year like some blush and eyeshadows.

MAC Pigments- I haven't used these before but I would really love to. I have a feeling I'll love these even more than the regular MAC eyeshadows.

pH Products- I've started to notice these products popping up more and more. By pH products I mean products that adjust color based on your pH. It started out with lip products but today at he store I noticed a blush and bronzer that claim to adjust it's color based on your pH. Really would love to try these products on myself and a few others.

Sonia Kaskuk Hidden Agenda Concealer Palette- I really want to try this for my under eyes and on any blemishes. I would really like to find a cheap concealer I like.


These are some of the products I'm hoping to try in 2013. Comment if you have tried any of these or maybe share your own list of things you would like to try. I hope your 2013 is off to a good start!

Wednesday, January 9, 2013

2012 Favorites!

Hi! Sorry I haven't posted in awhile life is getting stressful and busy. I thought it would be fun to do a favorites of 2012 and see how it changes next year. So let's get started!

Favorite Face Primer: Benefit Porefessional
Favorite Foundation: Tie between Urban Decay Naked Foundation and Kat Von D Lock-It Tattoo Foundation
Favorite Blush: MAC Breath Of Plum
Favorite Bronzer: Elf Bronzer in Blush and Bronzer Duo
Favorite Brow Products: Maybelline Define-A-Brow Pencil in Medium Brown
Favorite Face Powder: Elf High Definition Powder
Favorite Makeup Setting Spray: Urban Decay All Nighter Spray
Favorite Eyeshadow: MAC Satun Taupe and MAC Retrospeck
Favorite Eyeshadow Palette: Urban Decay Smoked Palette
Favorite Pencil Eyeliner: Urban Decay 24/7 liner in Perversion
Favorite Liquid Eyeliner: Urban Decay 24/7 Waterproff Liquid Liner in Perversion and Siren
Favorite Mascara: MAC Haute & Naughty Mascara
Favorite Lipstick: Tie between MAC Hue and MAC Odyssey
Favorite Lipgloss: American Eagle Lipgloss Duo
EDIT:
I decided to add some hair and skin products.
Favorite Shampoo and Conditioner: Bed Head Color Goddess and Paul Mitchell Forever Blonde
Favorite Deep Conditioning Treatment: Aveda Dry Remedy and Moroccan Oil Hydrating Mask
Favorite Styling Products: Aveda Volumizing Tonic, Redken Blow Dry Gel, Paul Mitchell Super Skinny Serum, Big Sexy Hair Backcomb In A Bottle, and Big Sexy Hair Volumizing Dry Shampoo
Favorite Face Wash: Cetaphil for Oily Skin
Favorite Mositurizer: Clinique Dramatically Different Mositurizing Gel
Other Face Product: DemraDoctor Pictuer Porefect