Friday, August 16, 2013

Going Blonde!

Hi! So as you can probably guess today's post is about me going blonde. I have been holding this off for awhile because growing your hair out and going blonde can be a challenge. Bleach can be so damaging for your hair which you do not want when you are trying to grow it out. So I'm going to kinda of start with what I did and where I hope to go with this. A little history about my hair I have gotten my hair completely platinum before. Platinum isn't really my color but I've also had it bleach blonde. If I had put a toner on it would become platinum but by not it was a little more warm neutral blonde which looked way better. Anyways I have always loved really light blonde hair. I've been wanting it for months but since I was growing my hair I held off as long as I could. Starting a few months back my hair was dyed around a level 5 this is how it looked.
I really hated it but I was slightly lighter than the color I did before. I left it this way for about 2 months. I let it fade and get as light as it could. In late June early July I decided to use some color remover and go to a half 7 half 8. My hair is naturally a level 7. This is how that looked.
 
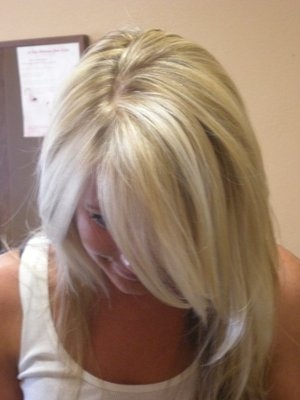
I think the color remover didn't work that great and it was still too dark. For some reason that last step with the neutralizer takes your hair back dark. Anyways about a month ago I caved. I needed bleach blonde even if it was just highlights. So I got all over highlights which made my hair look so much lighter. I really liked the color but in two weeks right before we left for vacation I really wanted more. So we put in more blonde highlights which is what I currently have.
 
 It definitely looks lighter but I'm already wanting more and it's only been a couple of weeks. I'm going to leave it like this up until I start my new job or at least that's the goal. But eventually I'm trying to achieve something more like this.


 
I know some are lighter and some are darker and they are different in their own way but I really want a multi dimensional blonde. Right now when my bf looks at my hair he says it is more caramel colored and I know he is referring to the darker color. I'm hoping to go light enough that he will say blonde not caramel. So I'm thinking I'm going to reach out to a friend that knows how I like my hair and have her do some serious foiling which I'll try to remember to take pictures of the process. I'm kinda hoping this helpful if anyone is trying to go lighter and doesn't want to right away reach for the bleach. Bleach your whole head can be.... actually quite scary. So this is a little more gradually and easier on your hair. I'll keep you guys updated and hope you enjoyed reading this!

Thursday, August 15, 2013

Day To Night Makeup

Hi! Today I'm doing this day to night look. I wore this look in Vegas. I wore the day look walking the strip during the day and the night look when we went to a show that night. It's pretty easy and it looks really nice. Anyways on to the day tutorial!
 
First I applied my Tarte Amazion Clay Foundation in Light. Then starting with the eyes I applied UD Bootycall from the Naked 2 palette. Honestly you can use UD Virgin instead if you prefer. I used Bootycall because this tutorial mostly uses the Naked 2 palette.
 
Next I applied UD Naked as a blending color just above my crease but below my brow bone.
 
Then I applied UD Tease into my crease and outer v.
 
To finish up the eyes I applied Bootycall to the inner corner. I applied Tease on my lower lashline. Then applied my 24/7 Perversion eye pencil to my upper lashline. I applied one coat of my L'Oreal Volminous Million Lashes mascara.
 
For the rest of my face I applied my elf blush from the blush and bronzer duo. I very lightly filler in my brows with my Rimmel pencil in Hazel. And lastly I applied MAC's Creme Cup lipstick.
 
Now onto the night look to step things up a bit! All I did was first lightly apply UD Blackout into the crease and outer v. Then I went back and I applied it heavier into my outer v to add more definition. Then to make it blend better between the Bootycall and Blackout I applied a little bit Tease and Hustle mixed together to create more of a gradient. I added a little bit of Blackout to my outer lower lashline. I contoured with my elf Blush and Bronzer duo. I added a second coat of mascara this time with my Sephora Atomic Volume mascara. I also defined more brows a little more. Lastly I applied MAC Craving lipstick but I prefer a more nude lip so I also applied MAC Hue lipstick.


That's it! Like I said it's easy and looks nice. I did the day tutorial during the day and the night one at night but I should have done both during the day because the day pictures look better because the lighting is better.  Anyways I hope you guys enjoyed this post. Thank you for reading(:
 

Tuesday, August 13, 2013

Growing Out A Bob: 9 month Update!

Hi! So it has been 9 months since I started growing my hair out and it feels like I'm finally making some progress. The hard part is my hair is at the really annoying point where it's too short to wear it in longer styles (ex. higher ponytails, buns, big loose curls, and etc.) but it's too long to wear it as a shorter bob style. The pictures will explain better than I can.


My hair doesn't look the greatest here but I'm trying not to heat style it. I'm really hoping another inch or two and it won't feel so awkward. Or maybe it needs to be cut but I'm going to convince myself not to for a little while longer. I'm also growing out my bangs. I think I'm going to have face framing layers once my hair gets longer. So what am I doing for my hair to help with this growing process?
1. Paul Mitchell Forever Blonde Set (shampoo, conditioner, and dramatic repair spray)- Obviously I have went lighter with my hair and plan to continue to do so which means my hair needs the keratin and moisture. This helps keep my hair in good shape.
2.Joico Moisture Recovery Treatment Balm - Keeping my hair moisturized and healthy
3. Rusk Multi 12 in 1 Treatment- Still using this as a leave in conditioner and heat protectant.
4. Scalp Massages- I usually do this while I shampoo
5. Biolage Keratindose Pro-Keratin Renewal Spray- I usually switch between this and the Rusk Treatment
6. WAY less heat styling- I've been playing around with different styles but trying to lay off the heat styling.
 
I have kind of stopped with my vitamins but I will try to get back into those.  My goal for 12 month update is somewhere around these lengths.


I finally feel like my hair is getting long enough for extensions so I should be getting some. I'm hoping to get my hair lighter and maybe not as warm first though. Sort of like MakeupbyTiffanyD's hair. Anyways I will keep you guys updated on this long process. It's hard to believe it's already almost been a year. Thank you for reading and I'll have another post up Friday!

Monday, August 12, 2013

Upcoming Posts!

Hi! We are back from vacation and I should be able to start posting more. Tomorrow I'll be doing my 9 month hair update tomorrow and a day to night makeup tutorial tomorrow or Friday. I don't have much planned besides that but I'm thinking maybe a fall fashion post and hopefully I can get some extensions soon too for review. Maybe a back to school makeup tutorial and a fall tutorial in like September or October. I'm open to suggestions but those are what is planned for this week. Thanks for reading and watch for my new post tomorrow!

Wednesday, July 24, 2013

Review: Tarte Amazion Clay Foundation

Hi! I have a few posts started but I've haven't really finished any of them. So I should have 3 posts coming about my hair (one is a growing a bob update and then 2 hair tutorials), a makeup tutorial using Sabbath eyeliner, and more reviews. But this was the review I was most excited about. I bought this foundation probably about at least a month ago.  This is how the packaging looks.
 Overall I like the packaging. Its convenient for traveling and the foundation is really easy to get out. Also you have pretty good control how much foundation you want out of the tube. The leaf is the color of the foundation so I'm thinking once you start getting low you should be able to kind of tell but maybe not because this foundation is on the thicker side. I also heard that the cap was bamboo which I feel like really goes with Tarte's whole theme. On to the actual product! So this foundation is suppose to be full coverage. Any time a foundation says that I am very skeptical. Kat Von D I would say is full coverage but it clogs my skin so I can't wear it much. However I do think this foundation is pretty full coverage. But I feel the coverage can vary. I have applied this with just my fingers before and gotten a sheerer application but if I apply with my Makeup Geek Deluxe Stippling Brush I get a more full coverage application. But one of my favorite things about this foundation is that you can use it as concealer. I rarely ever wear concealer because I feel like its just another product to add to my face. I just haven't found one that doesn't feel heavy and that I really like but I haven't tried too many. But on one of the first days I was trying this foundation out I had a zit that was red and painful. It covered ok with the foundation but I decided to try take a little dab of the foundation and try use it as a concealer. It worked super well. So now I apply my foundation all over my face and then go back and apply to any blemishes and under my eyes.The other claim this foundation makes is it lasts 12 hrs. I have tried this foundation with and without primer. The first day without primer by the end of work my foundation didn't look too bad. I was a little shiny and it had faded a little but it still looked pretty decent for it being 12hrs. Next I tried it with my Tarte Poreless Primer. I was less shiny and my foundation looked great at the end of the 12hrs. So I would say yes it definitely lasts 12hrs and a good primer will only help it last longer. I have had no problems with this breaking my skin out which is a huge plus. Also this foundation doesn't feel heavy. I know I said it was a thicker consistency but it doesn't feel heavy and a little goes a very long way. I have frequently squeezed too much out of the tube. It has SPF 15 and it doesn't have any parabens which also is great. So in the end would I buy this foundation again? YES! I think this maybe my holy grail foundation. I always get compliments on my skin and it's when I'm wearing this foundation. It makes my skin look good and feel good. I bought the shade Light but they just came out with new shades which is nice because that was the only bad thing is they only had a few shades. However I feel like the Light shade works very well for me. If I were you I hurry up and get this foundation because it really is amazing. Thank you guys for reading and I'm thinking I may redo the way I do reviews. I would like to include so swatches more pictures. Right now swatches turn out blurry on my camera so I'm going to have to mess with it more. Anyways again thank you guys for reading!

Sunday, July 21, 2013

Review: Urban Decay Naked BB Cream

Hi! I decided to get some reviews done today. I'm hoping to post a tutorial soon but I've been skipping the makeup on my day off. Anyways I thought I would do a review on the popular Urban Decay Naked BB Cream. This is how the packaging looks.
Overall the package I think is fine. I think it goes well with the rest of the Naked line. It;s easy to get the product out and it looks nice on my vanity. On to the actual product! Was hesitant to jump on the bb cream bandwagon. But I heard how amazing some of these were so I decided to try this one out because 1. I'm a big fan of Urban Decay and 2. I've been hearing good things. First out of the tube I was like I don't think this is going to work. I'm pretty fair usually and this was like medium toned. I thought for sure it was going to be way too dark on my face. However this blends right into your skin. I like medium to full coverage foundation so I knew this wasn't going to replace my everyday foundation. However I did expect a little more coverage than it actually had. I mean Urban Decay even  says "Optical blurring pigments instantly even out skintone and minimize the appearance of pores, lines, wrinkles, and redness." However I felt like this had no coverage. I've had tinted moisturizers and they had more coverage than this. I think it does make my skin look slightly better than it completely bare. So I shrugged my shoulders and went on to my next idea of how to use this product: a primer. I didn't notice much difference right after applying my foundation but I remained hopefully. Honestly I didn't notice a difference in how long my foundation lasted or really any difference at all. However this product did say my life a little bit. I've been not so nice to my skin lately and going tanning for our upcoming trip. Well since I've been testing this product out I've either been wearing it under my foundation or if I'm going to the gym to workout and tan I will apply this and just a bit of mascara to feel a bit made up. Well one day I wore nothing on my face at all. My face got burnt which then my face started to peel. Putting makeup on top of it just looked worse. But this helped me so much! It helped with the dryness it made the peeling noticeable under my foundation. Overall would I buy this product again? Maybe. Overall I think it makes an amazing moisturizer and sunscreen but I don't think it does much else. I do like that I can wear it to the gym when I feel like I need makeup but don't want to wear a lot. I'm hoping to try the smashbox one soon and do a review on it. Thank you for reading and I hope this is helpful.

Sunday, July 14, 2013

Coral FOTD(:

Hi! Today I'm posting my pretty everyday look for this summer. I will try to post a review or outfit of the day on Tuesday or Wednesday. Anyways here is the look.

 
Foundation: Tarte Amazion Clay Foundation in Light
Blush: Tarte Amazion Clay Blush in Tispy
Brows: Rimmel Brow Pencil in Hazel
Eyeshadows: MAC Satin Taupe( on the lid), UD Buck and Naked( blended into the crease), UD Sin( in the inner corner), and lastly matte highlight color from my 88 Warm palette.
Eyeliner: UD Perversion liner on my waterline
Mascara: L'Oreal Voluminous Lashes
Lip Gloss: B.E. Buxom Lip Gloss in Debbie 
 
 I really like the taupe and coral together. Plus it's super easy and looks more put together than it actually is. I'm hoping to post a tutorial with my new UD Sabbath liner. Also trying to decide if I should post a another update on my hair. Would it be better if I posted monthly updates or stick with the every 3 months (unless of course I cut my hair)? Anyways I'll have another post up soon. I did buy a few fall pieces so maybe an upcoming fall haul. I hope you guys enjoyed this post and thank you for reading!