Thursday, February 28, 2013

FOTD: Burlesque Set

Hi! So I decided to do a face or makeup of the day. I mostly used my Smashbox Burlesque set from like 2 years ago. I followed the directions on the box with some slight modifications. So here it is:


Foundation: MAC Studio Sculpt in NC15
Blush: Well Dressed
Eyeshadows: Smashbox Quad in Risque and Urban Decay Naked
Eyeliner: Urban Decay 24/7 Liquid Liner in Perversion
Brow Pencil: MAC Veluxe Brow Pencil in Deep Brunette
Lipstick: MAC Angel
Lipgloss: Smashbox Lip Duo in Peep Show
 
It was pretty quick and easy. The liquid liner is what took the longest. Anyways I'll probably have a review up tomorrow. Thank you for reading!(:

Wednesday, February 27, 2013

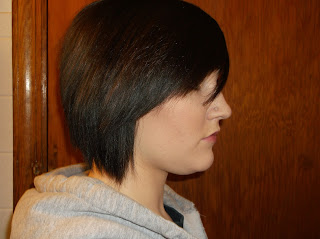
Growing Out A Bob: 3 Month Update

Hi! So it's been 3 months since I got my hair cut. It's only been 2 months since my blog post about my hair. I figured I would update you guys on what I'm doing different now and post some pictures of my hair. I guess I'll start with where my hair is now.


and this is one month after my haircut....


So there is some progress! For a long time it felt like it wasn't really growing much at all. My hair is still a little shorter than my last goal but I did say 3-5 months. Anyways let's move on to what I'm doing.
1. Hair, Skin, and Nails Vitamins- Still taking 2 of these everyday so not much different there. I have not stuck with taking these as much as I would like. I take them when I remember but I'm hoping to get better about it before my next 6 month update.
2. Joico Reconstruct Damage Shampoo and Conditioner- This is different than last time. I have been using this for awhile. Since I color my hair a lot I do what to repair what damage I can. Otherwise the ends will just break off and it will seem like your hair is not growing.
3. Joico Moisture Recovery Treatment Balm- This is different too. You may have read my review on the Moroccan Oil Mask. I decided to switch to this after hearing so many good reviews from friends. I've only used it 3 times and I love it so far. Quick cosmetology lesson. If you heat style your hair a lot your hair is mostly going to need moisture. If you do a lot of chemical services to your hair, your hair is going to need protein. So since I do a bit of both that is why I use the damage and moisture.
4. Avoid Heat Styling and If I Do Use A Heat Protectant- I've managed to cut my heat styling down a lot. Since it's winter I can manage putting on a lot of hats. If I had longer hair I would do braids and stuff. For heat protectants I'm using the same 2 as my last post or there is another product that I use which I will talk about next.
5. Rusk Multi 12 in 1 Leave-In Treatment- This is pretty much my leave-in conditioner. I got it as a sample on my last trip to Cosmoprof and I pretty sure I'm going to buy the full size. It controls frizz, smooths, detangles, moisturizes, strengthens, and adds body. It can also be used as a heat protectant. I'm so glad I got this as a sample.
6. Detoxing My Hair- I still do this about once or twice a month to get rid of product build up and get my hair really clean.
7. Moroccan Oil or Matrix Smoothing Oil- I apply some oil to my hair on days I want a very smooth sleek look and to add a little more moisture to my hair but I usually only use either one of these once a week.
8. Scalp Massages- I don't do this before my shower with the oil anymore. I usually just do this in the shower when I apply either my conditioner or my deep conditioning treatment. Sometimes I use my Paul Mitchell Tea Tree shampoo and conditioner because it has a slight tingle and I like it is helping get the blood circulating.
9. Being Healthy- I'm again just trying to be healthy but it benefits my hair. I'm trying to drink more water and eat healthy as well as exercising.
 
So you can see I added more things and changed some of the things I was already doing. I guess let's talk about my next goal for my 6 month update. This picture was my last goal.
So I think for my 6 month update that's going to be my same goal. Something like these which is about the same length or maybe a little longer.


I think these pictures below are going to be my 9 month goal.

I'm hoping to not have it in a bob anymore and have it evened out. Ideally I would like it a few inches longer since we will be going to Vegas near my 9 month update. But I feel like if it is at least this length I will be able to get extensions that will be just a few inches longer and add thickness to my hair. So I'll do another update in May for 6 months. My hair tends to grow a lot faster during the summer so I'm hoping my 6 month update will be a little more dramatic. I may get my hair cut at 6 months. It depends I guess on how it looks and feels. Anyways stayed tuned for more updates. Thank you for reading(:

Tutorial for Hazel Eyes

Hi! I really like this look for hazel eyes! Again I don't have a hazel eye model so this will be on myself. This look just kind of popped into my head as I was looking through my eyeshadows. Hazel eyes are nice because they are between green and brown so they can pull off a lot of colors. Anyways let's get started with the tutorial.
 
I started off applying my MAC foundation to my face. I start off by applying a mix of Urban Decay's Naked and Buck into my crease.
 
Next I apply MAC's Naked Lunch on the inner 1/3 of my lid. You could use Sin from the Naked palette as well.
 
Then I applied MAC's Sketch into my outer v and blended it into my crease. I tried to keep the color darker in the outer v. I also applied it to my lower lashline.
 
Now things start to get a little tricky. I took MAC's Cranberry and started applying on my outer lid. I started applying Cranberry where Skecth ends and blending it towards the middle. The picture demonstrates this better than I can explain.
 
Next I applied a small amount of Urban Decay's Half Baked as a blending color between Naked Lunch and Cranberry. I also applied a small amount on my lower lashline by my tear duct. I applied a matte highlight under my brow bone. It was just a color from my Coastal Scents 88 Warm palette.
 
 Lastly I applied my Urban Decay 24/7 Perversion eye pencil to my upper lash line. I smudged it into my lashline. I applied it to my upper and lower waterline. Then I applied 2 coats of my Sephora Atomic Volume mascara and the eyes are done.

 
On to the rest of the face(: I applied MAC's Breath Of Plum Blush and I contoured a little. I applied MAC's Creme Cup lipstick. And that's it!

 
It does look a little more red purple toned in person. But if you own Sketch and Cranberry you kind of have better idea of what the colors look like. I hope you guys enjoyed this tutorial. I have some reviews coming up also TWO tutorials using the L'Oreal Infallible Eyeshadow in Midnight Blue. Anyways thank you guys for reading!(:
 

Thursday, February 21, 2013

Spring Haul(:

Hi! So even though it's snowing as I speak type, I can't help but think about spring and summer. I'm getting super excited for our trip to Vegas in August. Anyways since my birthday is in October and Christmas is in winter my spring/summer side of the closet is pretty small. I decided to buy a few things focusing on the warmer weather. So let's get started(:
 

Here is a picture of most of the stuff I got. I bought stuff from MAC, Sephora, Forever 21, Target, and Cosmoprof. Starting with MAC I bought my usual Studio Sculpt Foundation in NC15 and I bought the new Veluxe Brow Pencils. I'll do a more in depth review on it later but it's almost like a powdery pencil and I got mine in Deep Brunette. I also turned in some empties and got Creme Cup lipstick. Next on to Sephora! I originally bought 3 things when I went. First I bought the Sultra blue clip in extension you see in the picture and I also bought a Spehora blush and an OCC Lip Tar in Memento. I didn't like the way that the blush and the lip tar looked on me so I returned them. I would have just exchanged them but my Sephora has a horrible section of the OCC lip tars and the blush I wasn't crazy about. So I ended up with just the clip in extension. Next Forever 21 I bought most of my stuff there. So the first thing I bought was this top for my friend's birthday party.

I love the studs on the shoulders. I can't even explain how much I love this shirt lol. I already removed the tag but I believe it was $17.80. I also bought the necklace in the picture. Here is a closer look.
It's simple and pretty. It goes with soooo many outfits and things in my closet. I think this was $1.80. Next I bought this sweater.

I've been just as obsessed with that mint color as everyone else lately lol. This is my second mint sweater. I like this one more because it has 3/4 sleeves, a v back, and it's lightweight. It's a great sweater for spring. It cost 19.80. I also bought this shirt.
This peachy color is the other color I am obsessed with for spring. This shirt is ridiculously comfy. It's great for running errands, traveling, or lounging around the house. I think I might wear this on the plane to Vegas with either some cute white denim shorts or the pants I bought in the next picture. This shirt cost $9.80.
They are your basic yoga pants and they have stars on the waistband. They aren't full pants so I guess they are more like capris? Anyways they also have it with a mint color star waistband and I resisted and bought the white because honestly it will go with more of my clothes. These were $8.80. (Why does everything end in 80 cents at Forever 21?)  Next on to Target. It was very hard for me not to buy everything at Target. They had a maxi dress, a cute summery dress, shorts, swimsuits, swimsuit cover ups, sunglasses, and shoes that I all really want for our trip to Vegas or for the summer in general. Instead I grabbed this literally as soon as I walked in the door.
I resisted the urge to buy everything in the store but ended up buying something pretty practical. I wanted something like this so I can go out and not carry around my purse or run into a store and again not carry my purse. Also it is mint colored(: They had one that was mint chevron that I wanted but it was smaller and half was for your phone and I wasn't sure if I would use the phone half of it. I may go back and get it though because I really like that one. This was $14.99. That was my only purchase at Target so on to Cosmoprof. You can kind of see what I bought in the first picture. I bought the Paul Mitchell Tea Tree Shampoo and Conditioner ($6.99 and $7.19). I mostly bought this for my hubby because I heard a lot of guys like the tea tree line. As far as I can tell he likes it. I do too but I haven't used it enough to review it yet (I've only used it once). I also bought a very small Paul Mitchell Tea Tree Lavender Mint Conditioner($3.49). The lavender mint was suppose to be hydrating. I've used it once but I like it so far. I also picked up the Joico Moisture Recovery Treatment Balm ($13). I haven't used this yet but it has got some great reviews from my friends, it smells like heaven, and is this wonderful thick mask. I will definitely do a review once I use it a few times. I also grabbed a China Glaze nail polish in Peachy Keen (again with the peach color).
Can't wait to try this color out(: Well this is the end of my haul. I will probably be doing lots of hauls this spring/summer. Next I should have some reviews and tutorials soon. I hope you guys enjoyed my haul and thank you for reading!(:

Friday, February 15, 2013

Tutorial for Brown Eyes

Hi! It took me awhile to come up with the brown eye tutorial but in the end I came up with this look. Sorry but I don't have a brown eye model so I will be doing this on myself. I really like blues, purples, and golds on brown eyes. I LOVE this tutorial and I'm kind of proud of it. On to the tutorial!
 
Starting off I applied my MAC foundation and L'Oreal Lumi foundation to my face. Next I applied my primer which is Urban Decay Primer Potion. I always apply primer or base but sometimes I forget to list it. The first eyeshadow I applied was Urban Decay's Buck into my crease and then I blended it up and out.

Next I applied Speed Blue out of the Kat Von D Beethoven palette to my lid.
 
I used a color I have never used before from my Wet n Wild Petal Pusher palette. It's the bottom color on the left side. It's a gorgeous blue purple color. I applied that in the crease and mostly focused it there. I didn't want to cover up Naked. I also applied it along the lower lashline.
 
 
Then I applied Urban Decay's Gravity into my outer v and a little into my crease.
 
To add a little more definition I applied a small amount of Lucifer from the Kat Von D palette in to my outer v. You can use whatever matte black you want.
 
 
 I combined a few of the last steps. I applied my Urban Decay 24/7 Perversion eyeliner along my upper and lower lashline. I smudged it out as I almost always do. I decided to apply a matte highlight since the rest of the eyes are dramatic. I mixed the very light blue color and a skintone color (both matte) from my Coastal Scents 88 Warm palette. I applied that to my inner corners and under my browbone. (I'm not sure why the highlight under the browbone is more noticeable on one eye than the other but I didn't notice it in person.) Anyways I applied my Sephora Atomic Volume Mascara. Lastly I cleaned up under the eyes to make sure any fallout doesn't accentuate any under eye circles.


Now for the rest of my face! I kept it pretty toned down because the eyes are the stand out feature. I contoured with my elf bronzer and then applied MAC's Well Dressed blush. Lastly I applied MAC's Creme Cup lipstick. I guess that's it but I feel like I'm forgetting something.


I hope you guys like this tutorial. It's super pretty. One eye color left and the one I've been working through in my head a lot. By the way this tutorial was kind of a pain because I had to do it with my glasses on instead of my contacts. I wasn't too happy about this...
 Anyways thank you for reading and I'll have the next tutorial up sometime soon!

update(:

Hi! I decided to update you guys on what I have coming up. Tonight I'm hoping to post the tutorial for either brown or hazel eyes now that the Valentine's tutorials are done with. I'll have some reviews up either tonight or in the next week. I'll have a haul up on Sunday. I should also have an outfit of the day up on Sunday too. Right now I don't have a plan for any tutorials besides the eye color ones. I have to start thinking of some ideas or maybe just playing around with my makeup and hopefully coming up with something creative and fun. I do have some eyeshadows I would really like to use for a tutorial. That's all I have planned for right now. I'm sorry if things get hectic and I don't post as often. I hope everyone had a great Valentine's Day. I did even though I'm like the Grinch of Valentine's Day. Anyways I'll post something again later. Hope your having a good day and thanks for reading!

Wednesday, February 13, 2013

First Impressions: Tarte Clean Slate Deluxe Primer Trio


Hi! Sorry I haven't posted anything in awhile. I've been super busy trying to get this job. Also it's my friends birthday on Valentine's Day and we are going out this weekend so I had all that to look forward to. Anyways I'm just going to do a first impressions post because so far I am amazed and love this product. I bought a few things at Sephora the other day. I mostly wanted mascara and I noticed Sephora has one on sale for $5 so I bought that. I was also going through my shopping list/wish list and noticed I had the Tarte Clean Slate Deluxe Primer Trio on my list and it was $9. I was kind of on the hunt for a primer that would work for me with my large pores and this kit included that. So this is what it looks like:
 
The primers are a little smaller then what I was hoping. Today I tried out the first purple one which is for large pores. It also claims to last 12hrs. I decided to try the eye primer too. When I first applied the primer I already noticed a difference in my pores. It's very lightweight and a small amount goes a very long way. After I applied my foundation my face looked flawless. Super happy with it so far. Right now it has been 11 hrs and my face looks really good. My foundation isn't as perfect as when I applied it but it's a LOT better than it usually is. Also my face is normally pretty oily. Right now my face looks like how to usually does after 3 hrs without primer. A very small amount of shine that could be mistaken more as a glowy foundation. Another huge plus that it keeps shine away for that long.  I didn't set with a powder or anything because I wanted to really test this primer. I image if I had set it the results would be even better. I would definitely buy it again and I'm considering it. The full size one is 1 oz. and costs $30 which I feel is pretty much the usual for primers. I have tried the Benefit Porefessional and I think this one is better because I get a better matte finish with it and this makes my makeup last longer. Now on to the eye primer! The primer is a little more liquid-y than I'm used to (I normally use Urban Decay Primer Potion.) It being more liquid-y ended up being a plus because you need such a small amount to cover your entire lid. I decided to use my Coastal Scents 88 Warm Palette because these eye shadows don't last that long on me with primer or a base. First thing I noticed was this primer really grabs your eyeshadow and holds. It can be a bit hard to blend at times because of that. However it was only a slight negative. This primer has the same promises of lasting 12hrs. My eye makeup looks FLAWLESS!!! I cannot emphasize that enough. It does not look any different then when I applied it this morning. I'm sooooooooooooo happy with this primer. So much so that I may even get this instead of my Urban Decay Primer Potion (I'm a huge Urban Decay fan). The full size is 0.39oz and it costs $22. I really love this primer and can't image what I'm going to do when I run out (just kidding...sort of). Tomorrow I'm going to try the brightening primer that comes with the set. I'm hoping I'll like that one just as much as I love the first two. Anyways I hope you guys enjoyed this first impressions post. I should have a haul post coming up soon. Thank you for reading!(:

UPDATE: First impressions of the other primer. This one was brightening and I wasn't positive what this was suppose to do. I mean it says brighten but was it going to be luminous or matte. How was it going to brighten? That was my main question. I didn't see the same immediate results that I did with the poreless primer. After I put my makeup on it was a HUGE difference though. My skin looked radiant and glowy. While this is a beautiful primer I'm not a huge fan of it for my oily skin. I still like it but I will probably only use it when I feel like my skin needs a little bit of a pick me up. Overall these primers are AMAZING!!! I planned on picking up the full size versions today but my Sephora was sold out besides the brightening one. I will eventually get them. But I highly recommend trying them!